Setting up a Linode server for running an Amazon Mechanical Turk experiment with psiTurk
August 20, 2017 (Last updated: May 29, 2020)
August 20, 2017 (Last updated: May 29, 2020)
This is the first post in a series of blog posts about how to run an experiment with Amazon Mechanical Turk, using psiTurk.
This first post will cover setting up a server to host the experiment. If you’re unfamiliar with psiTurk, psiTurk is, according to the documentation:
designed to help you run fully-customized and dynamic web-experiments on [Amazon Mechanical Turk]. Specifically, it allows you to:
- Run a web server for your experiment
- Test your experiment
- Interact with [Amazon Mechanical Turk] to recruit, post [Human Intelligence Task]s, filter, and pay participants ([Amazon Mechanical Turk] workers)
- Manage databases and export data
psiTurk also includes a powerful interactive command interface that lets you manage most of your [Amazon Mechanical Turk] activity.
In brief, psiTurk allows you to deploy more customized experiments to Amazon Mechanical Turk. Fair warning, however: the following tutorial assumes that you are relatively familiar with psiTurk. It also assumes that you are comfortable with a little bit of programming and using the command line on a computer.
In this first post, I will cover how to set up a web server, which is where you will eventually run psiTurk.
Why a webserver?
First, let’s start with the question of why you need a web server to run your experiment. There are at least two reasons. The first is that by using a web server, you will (most likely) receive a static IP address.
If you’re unfamiliar with IP addresses, these are basically the phone
numbers of the internet. Each device that is connected to the internet
receieves an IP address. Moreover, URLs like https://google.com are
actually translated into an IP address when you go to visit that
website. At the time of writing this blog post, https://google.com
gets translated into the IP address 172.217.8.14. So when you go to
https://google.com, you’re actually connecting to a computer whose IP
address is 172.217.8.14. I’m not sure about you, but, for me, the URL
is a lot easier to remember than the IP address.
Now, what’s important about a static IP address is that, well, it’s static; it doesn’t change. With the proliferation of computing devices, there are way more devices connecting to the internet than there are possible IP addresses. Thus, most personal computing devices end up receiving a dynamic IP address from the internet service provider, based on what IP addresses are available at the time when the device happens to connect to the internet. (With routers, it’s a bit more complicated than this, but that’s outside the scope of this blog post.)
So having a static IP address for your computer (or server) that is running psiTurk will make things easier. Specifically, when you recruit people on Amazon Mechanical Turk, you can point your participants to a single address, without having to worry about that address possibly having changed since you posted your experiment to Amazon Mechanical Turk.1
So how do you get a static IP address? If you pay for a virtual private server, you will most likely get a static IP address. There are several companies that offer virtual private servers, including Linode and Digital Ocean. Both of these companies do give you a static IP address when you pay for a virtual private server.
One alternative you may wish to consider is the possibility of receiving a static IP address from your university. It is quite likely that your university can provide you with a static IP address for a particular computer. Then, you could configure a computer in your lab to have that static IP address and to run psiTurk. This is not something I will cover in this series since doing this is dependent upon the IT infrastructure of your university as well as the operating system of the computer you choose to use. If you do decide to do this, all future posts in this blog series should nonetheless still be relevant and helpful.
A second reason you might wish to pay for a web server is because you can pay for the resources you need. If you look at the different pricing options for Linode, for example, you’ll see that you can pay for more memory, more CPUs, more storage, and more bandwidth. In particular, if you’re running a large experiment, you might wish to consider a web server over a personal computer with a static IP address from your university because you’re likely to get better bandwidth through a company like Linode.
I happen to use Linode, not Digital Ocean, so the rest of this blog post will cover how to set up a Linode account and provision a virtual private server of our own.
Getting a Linode account
If you find this blog post or any other posts in this series useful, I encourage you to sign up for Linode using my referral link. If you choose to use the referral link, thank you! 🎉 If you’d rather not, no worries! 😎 I hope you still find this information useful.
Creating a Linode
After you create an account, you’ll need to create a Linode. Linode actually has really good documentation for how to get started, so I recommend that you follow the instructions in their documentation for provisioning a server.
I’d recommend that you choose to use the most recent version of Ubuntu, which is one of the more popular versions of Linux.
Connecting to and configuring the server
The following instructions are largely taken out of the “Getting Started with Linode” guide. Especially if this blog post is old, I’d recommend that you simply read that guide.
However, since the guide tries to be generic for all possible operating systems, I’ve pulled out the instructions for Ubuntu and put them in this blog post in an effort to be more helpful and condense the information that you need in order to get started. Moreover, you’ll minimally need to read the end of this blog post where you learn which port you’ll need to open up for incoming connections for psiTurk.
Anyway, once you’ve provisioned and booted up your server from the Linode interface, you’ll want to connect using SSH. SSH is a protocol for connecting from one computer to another, using the command line.
In order to connect, you’ll need to know the IP address of your Linode server, which you can find from the Linode website:
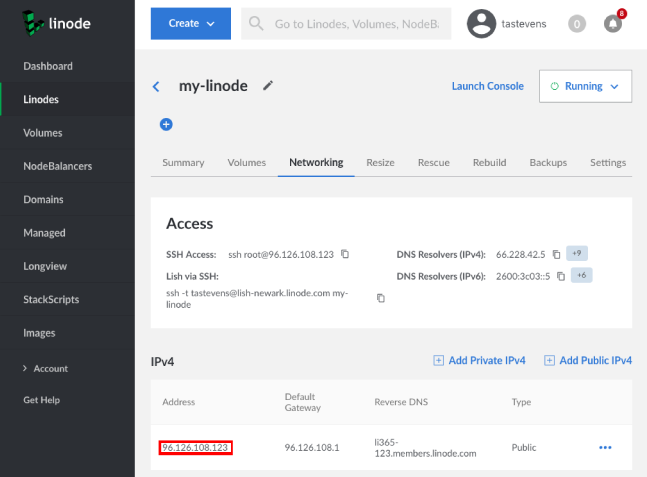
In the example image shown, you’ll want to use the IPv4 address, which
is 96.126.108.123. Of course, you’ll want to use the address you see
in your browser, not the address from this image!
To connect to your new server, open a command line and run the command, replacing the 0’s with the IP address of your server:
ssh root@00.000.000.00You’ll be given an authenticity warning, to which you should answer
yes. Then, you’ll be prompted for a password. Enter the password for
the root user that you created in the provisioning process.
Now, the first thing you’ll want to do to configure the server is install software updates. You can do this on Ubuntu by running the following commands:
apt-get update -y && apt-get upgrade -yNext, you’ll need to set the hostname of the computer. If you’re using
a version of Ubuntu equal to or more recent than 15.04, you can do this
with the following command, replacing giraffe with whatever you want
the name of your server to be:2
hostnamectl set-hostname giraffeAfter this, you can also set up the correct timezone using the command:
dpkg-reconfigure tzdataSecuring your server
You’ll also want to do some work to secure your server. The following is also largely taken from the Linode documentation for “Securing Your Server”, but I’ve pulled out just the parts that are relevant for Ubuntu. Again, however, if you’re reading this far in the future, you may wish to refer to the Linode documentation directly.
You’ll first want to create a non-root user, which you can do with the
following command, replacing your_username with whatever user name you
want:
adduser your_usernameYou’ll then want to add the user to the sudo group, replacing
your_username with the name of the user that you just created:
adduser your_username sudoNext, you need to do some things on your personal computer, so disconnect from the server:
exitCurrently, you can connect to the server using the password of the user that you just created, but it’s safer to only allow access with SSH keys, not passwords.
To do this, you’ll want to create an SSH keypair on your personal computer. This creates two files: a public key and a private key. You’ll want to upload the public key to your server, and you’ll want to keep the private key safe on your computer.
To create the keypair, use the following commands on your personal
computer (not the server!), replacing COMMENT HERE with a comment
of your choice (such as the name of your personal computer):
mkdir -p ~/.ssh
chmod 700 ~/.ssh
ssh-keygen -t rsa -b 4096 -C "COMMENT HERE"
The ssh-keygen command will prompt you for some information, including
where to save the keypair and what passphrase to give the keypair. The
passphrase is used to unlock your private key, which is stored in an
encrypted format on disk. Choose a strong passphrase, and I’d recommend
using the default location for the keypair of ~/.ssh/id_rsa. This will
save the public key to the file ~/.ssh/id_rsa.pub, and the private
key to the file ~/.ssh/id_rsa.
Next, you’ll need to reconnect to the Linode server so you can upload
your public key, replacing your_username with the name of the user you
created and the 0’s with the IP address of your server:
ssh your_username@00.000.000.00For now, you’ll still login with your password for that user, but this is what we will be changing momentarily.
On the server, you’ll also need to create an ~/.ssh directory and set
the right permissions. Moreover, you’ll create a file called
authorized_keys, which is where you’ll put your public key from your
personal computer:
mkdir -p ~/.ssh
chmod 700 ~/.ssh
touch ~/.ssh/authorized_keys
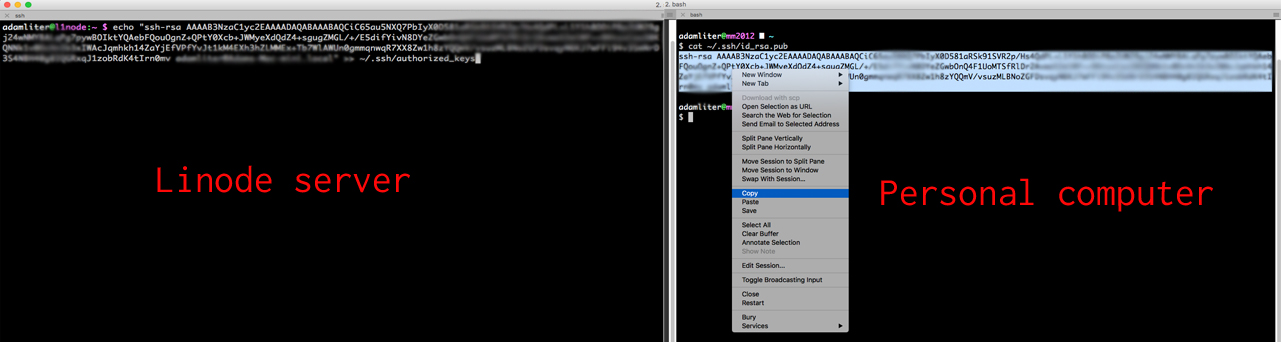
chmod 600 ~/.ssh/authorized_keysNow, in your command line program, open another window or tab so that you have two shell sessions running. In the second shell session (which should not be connected to your server), run the following command:
cat ~/.ssh/id_rsa.pubThis will print the contents of the file ~/.ssh/id_rsa.pub to the
screen, which you can then copy and paste into the following command.
This command should be executed in the first shell session that is still
connected to your server, replacing the CONTENTS OF id_rsa.pub FILE
with what you just copied and pasted from the other shell sesssion:
echo "CONTENTS OF id_rsa.pub FILE" >> ~/.ssh/authorized_keysHere’s a screenshot of what you need to do, in case it is helpful (I’ve blurred out the details of my own key):
You should now be able to connect to your server using your SSH keypair.
Next, we want to configure things so that you can only connect using
your SSH keypair and so that you can only connect as a non-root
user. To do this, you’ll need to edit the file /etc/ssh/sshd_config,
which you can do using the nano text editor.
You’ll need to open the file with root privileges, so run the
following command:
sudo nano /etc/ssh/sshd_configFind the line that says PermitRootLogin and change it to the following
(or, if the line does not exist, create it):
PermitRootLogin noSimilarly, find the line that says PasswordAuthentication and change
it to the following (or, again, if the line does not exist, create it):
PasswordAuthentication noYou can close the file with CTRL+x, after which you will be prompted to save the file, which you can do by typing y, and then hitting ENTER to save it. To cause these changes to go into effect, you’ll need to restart the SSH service:3
sudo systemctl restart sshdThe last thing you’ll want to do to secure your server is to configure a
firewall. This will allow you to determine which types of connections to
allow. This is easiest to do with a program called ufw (uncomplicated
firewall). Linode also has documentation for
ufw, which you might wish to refer to,
especially if this blog post is old.
However, the Linode documentation cannot tell you which ports you’ll need to open for psiTurk to work. Specifically, you’ll want to allow incoming connections on ports 22 (for SSH connections) and 22362 (for psiTurk).
To do this using ufw, you’ll first need to install ufw on your
server with the following commands:
sudo apt-get update -y && sudo apt-get upgrade -y
sudo apt-get install ufw
Next, as a starting point, make everything restrictive by allowing all outgoing connections and denying all incoming connections:
sudo ufw default allow outgoing
sudo ufw default deny incoming
As mentioned, the two ports that you want to allow incoming connections on are ports 22 and 22362. To do this, run the following commands:
sudo ufw allow 22
sudo ufw allow 22362
To enable these new firewall settings, run the following command:
sudo ufw enableAnd that’s it! Now you have a Linode virtual private server with a static IP address. In the next post of the series, “Using Docker Compose to run psiTurk and MySQL”, I will cover how to set up psiTurk.
Remember, if you found this information helpful, please consider signing up for Linode using my referral link. 🖖
And please feel free to comment with any questions!
Notes
-
It is possible to run psiTurk from behind a personal router by either configuring port forwarding on your personal router or by using a psiTurk feature that was added in version 2.1.0 of psiTurk (see GitHub Issue #99 for more information). Nonetheless, I’d highly recommend not doing this since it is likely to be less reliable. Also, I think the person who was developing this feature is no longer part of the NYU Computation and Cognition Lab, which maintains psiTurk. Thus, I think this feature is effectively dead, making it best not to rely on it. ↩
-
If you’re following along with the “Getting Started with Linode” guide, it will tell you to update the
/etc/hostsfile next. This is only necessary if you want to associate your server with a custom domain that you own. This is unnecessary for our purposes, and detailing how to configure this properly is outside the scope of this blog post. ↩ -
If this doesn’t work and you’re using an older version of Ubuntu, try
sudo service ssh restart. ↩